
Some time ago we made an article about the business value and the essentials of the Progressive Web App technology. Today is the time to go a bit deeper into technical details and show you how to make a native app out of a PWA in just a few steps.
The point is, while PWAs are fast, far more lightweight than native applications, and often more flexible, they have a certain set of limitations that we discussed in the previous article, mainly connected with their inability to appear in app stores. So the logical follow-up is to ask if there’s a possibility to take a PWA and make it look like a native app, publish it in the App Store and everything? There is! In fact, we’ve already mentioned it too and discussed its benefits and requirements. Time to look into how you can actually create one.
Contents:
How to make a PWA
First, let’s see how to make a PWA to work with.
Important to know: Your website has to have an SSL certificate and support the HTTPS protocol. PWAs can’t work without observing these requirements.
You need to know that a modern PWA application consists of the following key elements:
- Manifest.json file.
- Service Worker.
Let’s take a closer look at each of them.
Manifest.json
The purpose of this file is to tell the browser that your website can be executed as a progressive application. It contains the name of your app, its icon, and other necessary information. You can find out more about its parameters in this article.
Just simply adding the Manifest.json file makes browsers see your website as a PWA, and lets it be installed as a mobile application. But so far it has little in common with a real mobile app.
Service Worker (SW)
In simple terms, it’s a layer between the browser and your website. A Service Worker is a script executed in the background, unable to block the JavaScript execution thread, and executed in a separate thread. The key point is that the SW runs in the worker context and does not have access to the Document Object Model (DOM).

Service Worker has its own lifecycle events. You can find out more about them here.
SW also allows you to cache and spoof requests that come to your website from the browser. For example, knowing that all your CSS and JS files don’t change, you can cache them. In this case, the browser will receive these files from the Service Worker, without the need to make a request to your site.
For the convenient work with cache in SW, Google has developed a group of workbox libraries. The code shown later in this article is made using these libraries. Workbox provides several caching strategies designed to meet a wide variety of needs. You can read more about each of the strategies on Google Developers.
How to connect the Service Worker
To connect the SW, you need to use the browser API that provides a method for registering workers. Often, the connection code has a general form, which you can get acquainted with here.
Cache with Workbox
As mentioned earlier, workbox provides different caching strategies, and each file type needs its own strategy. For example, font files are least subject to changes, therefore, they can be set to longer time expiration. This is actually a very broad topic, and we advise you to use our example.
How to make an offline mode
For your web application to be more similar to the native one, it must be able to work in the absence of an internet connection.
Full offline
The implementation of a full-fledged offline mode implies a localized use of cache. Not every PWA application needs it, as it can take a lot of time. The main idea is in caching all the HTML pages of our application, as well as some responses from the backend required for the app to work correctly. And at the same time, we need to make it so that our web app shows a popup or toast to notify the user and continue to work with the cached data further. You can read more about communication between the Service Worker and web applications in this article.
This topic is hard to analyze in more detail since this approach depends heavily on the architecture of the web app itself and does not have a commonly accepted implementation.
Offline overlay
Almost always, the implementation of this task has the same solution: at the time of installation of the service worker, it makes a request along a certain path behind the HTML page and caches it. In the absence of an internet connection, the page content will be displayed to the user as an overlay. We recommend adding a refresh button to this page with `location.reload ()`, so that when the user is sure that their internet connection is restored and they can update the application without having to restart it.
We advise creating an /offline page on your website. And then use our example.
How to enable the PWA installation
There’s ample information on this point here.
How to make native apps using PWA for iOS and Android
The goal is to publish an app on Google Play and App Store, and PWA can only be installed from the browser. So, we need a wrapper around a PWA that would make it look like a real native deal.
To develop this kind of app, you’ll need people with experience in developing for either iOS or Android.
iOS
For the native wrapper, we need to create an iOS project:

In the newly created project, add a WKWebView. Here, we’ll, in fact, show our PWA application. For the first launch and to check the functionality, just call
 let urlRequest = URLRequest(url: appURL)
 webView.load(urlRequest)
Further customization involves implementing the WKWebView delegate methods. To make it fully operational, it’s enough to define 3 methods.
Method 1 tells us that the application has finished loading and we can, for example, hide the progress bar:
func webView(_ webView: WKWebView, didFinish navigation: WKNavigation!)
Here we process/show the loading error to the user:
func webView(_ webView: WKWebView, didFailProvisionalNavigation navigation: WKNavigation!, withError error: Error)
This method allows us to deny or limit/redirect navigation. In the case of a PWA application, it makes sense to allow navigation only by URLs that belong to the PWA and leave the rest of the URLs to Safari.
func webView(_ webView: WKWebView, decidePolicyFor navigationAction: WKNavigationAction, decisionHandler: @escaping (WKNavigationActionPolicy) -> Void)
func webView(_ webView: WKWebView, decidePolicyFor navigationAction: WKNavigationAction, decisionHandler: @escaping (WKNavigationActionPolicy) -> Void) {
        guard let url = navigationAction.request.url else {
            decisionHandler(.allow)
            return
        }
        if let host = url.host, host.lowercased().contains(Constant.allowedHost) {
            decisionHandler(.allow)
        } else {
            if UIApplication.shared.canOpenURL(url) {
                UIApplication.shared.open(url, options: [:], completionHandler: nil)
            }
            decisionHandler(.cancel)
        }
    }
You can find the full project here.
Android
There are 3 types of applications that you can develop on Android as per our subject:
- WebView. This option implies launching your own browser to execute a PWA in it.
- Custom Tabs. Your application will use a user’s own browser without creating your own. This option is suitable for already existing native applications, and cases when there’s a need to open web pages. This method is poorly suited for the PWA execution since a user would see the browser toolbar.
- Trusted Web Activity (TWA). A standard for implementing a PWA application. With this option, you use the user’s browser in such a way that they don’t notice it, in contrast to Custom Tabs.
OK, we understand that we need to use the TWA method, but what are its features?
- Our TWA application and browser have a common context which provides the following advantage: if a user is logged in to the web version of the application, they are also logged in to TWA, and vice versa.
- You cannot inject the JavaScript code into the page. Also, there’s no access to content and requests that are performed between a PWA and a server. These restrictions ensure user safety. But we can still pass data through the query params.
- Our PWA application can only “know” that it was launched as TWA from the referer header only. While in iOS we can easily determine this from
`window.navigator.userAgent`. - We still have the ability to use native platform features such as push notifications.
To create a TWA, we recommend using Bubblewrap (for web developers), or Android-browser-helper. The whole development process consists only of the configuration of an already finished project, namely, making changes to the build.gradle files. You can read more about creating TWA here.
How to publish native apps using PWA
App Store
Apple has detailed information about submitting apps to the App Store in their documentation. In case you need a step-by-step guide from an experienced developer, there are plenty of those on the web, like this one.
Just keep in mind that experience tells us that the most common reasons for app rejection are the following:
- You have seriously violated Apple’s guidelines.
- An app doesn’t have enough functionality to be considered complete.
- Lack of sufficient information about the app.
- You did not specify clearly enough the purposes of requesting access to the device’s hardware or user data.
Google Play
Google too has published a group of articles describing an application publishing process.
Please note that in order not to display the browser interface (address, menu, etc.) in your application after adding it to the Google Play Console, you need to add this file containing the following:
[{
   "relation": ["delegate_permission/common.handle_all_urls"],
   "target": {
       "namespace": "android_app",
       "package_name": "com.company_name.twa.app_name",
       "sha256_cert_fingerprints": ["96:00:...:8D"]
   }
}]
The package_name parameter must match the parameter that you specified when creating the application as applicationId.
The sha256_cert_fingerprints parameter must contain the certificate that is generated after adding the application to the Google Play Console, and which can be obtained by App signing -> App signing certificate -> SHA-256 certificate fingerprint.
Bonus point. How to make native push notifications
At the moment, the best tool for creating and sending push notifications is Firebase, so in the examples below, we’ll be using this particular service.
If you don’t plan on developing a native application using PWA, then you can use the Service Worker tools to implement push notifications. Firebase provides a detailed article about it.
The main problem of implementing push notifications by means of SW is that a user must give their consent, which can make them distrust the app. This is because Service Worker gets loaded from every website a user visits. This confirmation exists to let them avoid being bombarded with unsolicited notifications.
Unlike SW, native applications can send notifications without user permission, since they give their consent to this when installing.
In this article, we want to analyze in more detail the approach that involves using native applications.
Android
As stated earlier, Firebase is out of competition, and our implementation is based on this service.
We’ll use the code examples from the project available here.
FCM connection
First, we need to add Google Services to our dependencies: bundle.gradle and app/bundle.gradle. Next, you need to download the google-services.json file you can learn more about in this article. Place this file in the app.
Adding notification icons
Note that the Android Style Guide insists that the icon must be a mask, namely white color so that the Android can later fill it with any color. Also, the icon should be of different sizes. To create an icon, open Resource Manager, press + and then Image Asset.
![]()
In the window that appears, select Icon Type as Notifications Icons, and configure the icon based on your needs.
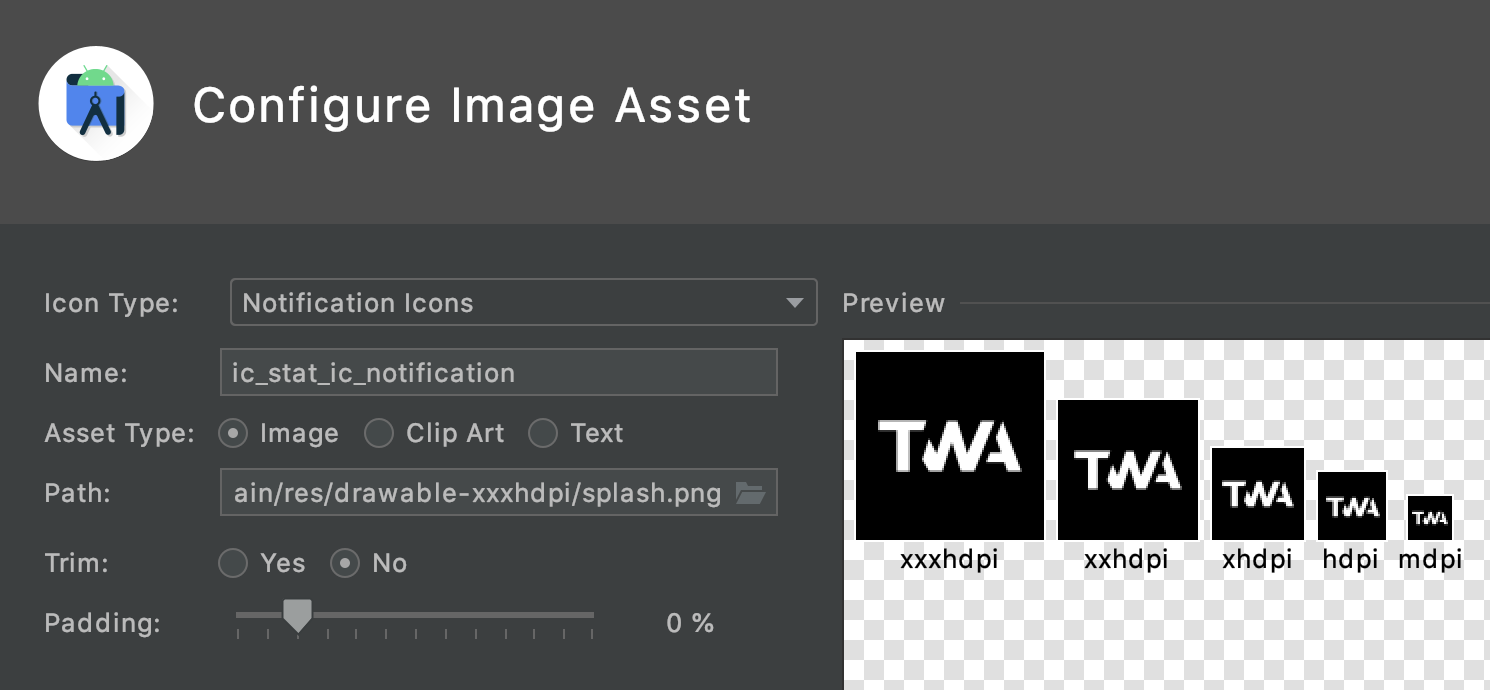
Having created the notification icon, connect to Firebase in app/src/main/AndroidManifest.xml.
Default notification channel declaration
This channel receives notifications when no channel is explicitly assigned to them. To do this, we need to add the value to values/string.xml and connect it to app/src/main/AndroidManifest.xml.
FirebaseMessagingService
This class gives us the ability to work this token reception, as well as the reception of Data Message in the onMessageReceived method. You can find an example of a class extension here, as well as learn more about its connecting it.
- onNewToken
This method is called the first time an application is launched after installation, as well as when it’s launched after its data is cleared. This is where we have to get the token and save it in the storage, we used SharedPreferences. Since onNewToken is called after an app is launched, we’ll need to restart the application in order for the launch to occur with the token. In practice, the process of restarting an application remains invisible.
- createNotificationsChannels
For simplicity of the example, we created this method of notification channel initialization and called it.
- onMessageReceived
To understand when this method is called, let’s look at the differences between Notification and Data Message.
Data Message
- It has a payload only in data.
- The payload can have any fields (title, body are optional).
- Firebase Cloud Messaging (FCM) doesn’t show a notification.
- It gets into
onMessageReceived, where we can, for example, create a custom notification from the data that came from Firebase.
Notification
- The payload in the notification is required and must contain a title and a body.
- It can receive a payload from data, which is available in LauncherActivity if a user clicks on the notification.
- FCM shows a notification, we cannot interfere (for example, to add a button).
From these differences, we can conclude that this method is called only for the Data Message.
In our example, we check that data has the payload field and then call the createNotification method passing remoteMessage.
- creatNotification
In our example, this method is responsible for displaying notifications for the Data Message.
- id
It doesn’t have to be unique, but in the future, it may be useful, since we can then find and remove a notification by its id.
- notificationIntent
This is an event that happens on clicking a notification, namely the launch (restart) of an app with the transfer of the data URL to data. You can also transfer any data via putExtras.
- actionIntent
An event that occurs when you click on the (action) button of the notification.
Extending the LauncherActivity class
First, let’s create a getURLFromIntent method, responsible for getting the URL from data and extras. We made the data entry in createNotification, whereas the URL in extras will contain it only when sending a notification with data: { url }.
The next step is to override the getLaunchingUrl method. It’s responsible for returning the URL when an app is launched. This is the moment when we can modify the URL by passing a token as a query parameter. You can learn more about this approach here. In our example, we get the token from SharedPreferences. Note that the token is not always present. Most often it happens at the time of the first launch after an app’s installation, which we already mentioned in the onNewToken clause.
iOS
Same as with Android, Firebase is the best choice for the job.
At the moment, there are two ways to transfer the FCM token to a PWA application:
- JavaScript
WKWebview allows Javascript to be executed on the app page, so we can pass the token to the application at any time after it’s loaded.
let jsStr: String = "window.appNotifications.token = '\(token)';"
                actualSelf.webView.evaluateJavaScript(jsStr, completionHandler: { (_, error) in
                    if let actualError = error {
                        debugPrint(actualError)
                    }
                })
- Pass the token via URL parameters when loading a PWA
In this case, before downloading a PWA, we need to make a request and wait for the FCM token to be received.
InstanceID.instanceID().instanceID { [weak self] (result, _) in
            guard let actualResult = result else {
                return
            }
           debugPrint(actualResult.token)
          // Load PWA URL here
        }
This method is preferable from a security point of view, but has several disadvantages:
- In case the Firebase SDK returns an error instead of
instanceID, the token can be re-sent only the next time an app is launched. - There’s an additional delay when launching an app, as we need to wait for the token.
The complete project is available here.
Web
A native wrapper passes the FCM token into the PWA one. Then you have to send it to the back end to make it associate a user with a device. For that, you can create a field with the said token and refresh it when needed. You can check out the example here.
Do you have a project that requires the latest mobile technologies? Contact us and let’s bring it to life together.