
If you’re an iOS engineer, you’ve probably heard about SwiftUI and UIKit, two tools responsible for how your iOS apps look and feel.
Contents:
SwiftUI is like the new cool kid in town, making it very easy to design screens, while UIKit is the older, more traditional way. With SwiftUI, you describe exactly how you want your app to look, UIKit, on the other hand, is more traditional, with a drag-and-drop style that some find familiar, especially if you’ve worked with Android XML.
Now, here’s the thing: when both tools can do the job equally well, do you really need to worry about picking between SwiftUI vs UIKit? Well, yes. The main factor to take into account is which versions of iOS you want your app to work on. SwiftUI only works on iOS 13 and newer versions. If you need to support older versions, you’ll have to stick with UIKit.
But that’s not the only thing to consider when choosing between SwiftUI vs UIKit.
Don’t worry though, we’re here to help you make the perfect choice. In this blog, we’ll discuss what SwiftUI and UIKit are all about, highlighting some key differences between them.
Let’s begin with understanding ‘What is SwiftUI’.
SwiftUI Overview
SwiftUI, introduced by Apple in 2019, is a game-changer for iOS mobile app development. It’s based on the Swift programming language and works well for iOS, macOS, watchOS, and tvOS. Unlike traditional methods, SwiftUI focuses on what you want your interface to look like, not how to get there step by step.
Basically, you describe your interface based on its state and layout, and SwiftUI takes care of the rest, making sure everything looks and works as it should, even when the app’s state changes.
Advantages:
- Declarative syntax:
One of the top benefits of SwiftUI is its clear and straightforward way of describing how your app should look and behave. Instead of getting confused with the nitty-gritty details and complex codes, you just tell SwiftUI what you want, and it takes care of the heavy lifting.
- Swift integration:
Since SwiftUI is built with Swift, it fits right in with the rest of your Swift code. This means you can use the same language and tools you’re already familiar with, making your job a lot easier.
- Live preview:
One of SwiftUI’s best features is the live preview. It lets you see your changes to the interface in real time as you’re working on it. This makes it super easy to edit things until they look just right.
- Unified codebase:
With SwiftUI, you can write one set of code that works across all Apple devices. That means less code to write and maintain, which saves you time and headaches.
Disadvantages:
- iOS version limitation:
The only downside to SwiftUI is that it only works on newer versions of iOS 13 and up. If you need to support older versions, you’ll have to stick with the old way of doing things.
- Performance concerns:
Using SwiftUI for complicated UI designs might lead to performance issues.
Moving on, to have a better idea of SwiftUI vs UIKit, let’s have a closer look at ‘what is UIKit’.

Custom refreshing animation showing Shakuro logo
UIKit Overview
UIKit is one of the veterans in the world of iOS mobile app development. It’s been around for a while and has been serving as the go-to framework for creating stunning user interfaces (UI) on iPhones and iPads. It’s equipped to handle touch events and user inputs, easily managing how users interact with both the system and your app.
Developed in Objective-C and later updated for Swift, UIKit has all the tools developers need to make the iOS user interface look great and work efficiently.
Advantages:
- Experience and extensive guides:
With plenty of documentation and examples available in the market, UIKit is beginner-friendly, making it a top pick for developers to get started.
- Complete control over UI:
Developers have the freedom to design every aspect of their app’s user interface including custom animations and layouts. Sounds amazing, right?
- Effortless integration with other Apple technologies:
UIKit works well with other Apple frameworks like Core Animation and Core Graphics, allowing iOS developers to build apps with advanced features that make the most out of iOS.
Disadvantages:
- Traditional programming style:
Writing code with UIKit can sometimes feel like writing a lot of instructions, which may make the entire development process unnecessarily time-consuming.
- Dependency on interface builder:
While it can be useful, interface builder sometimes makes things more complicated, especially in large-scale projects.
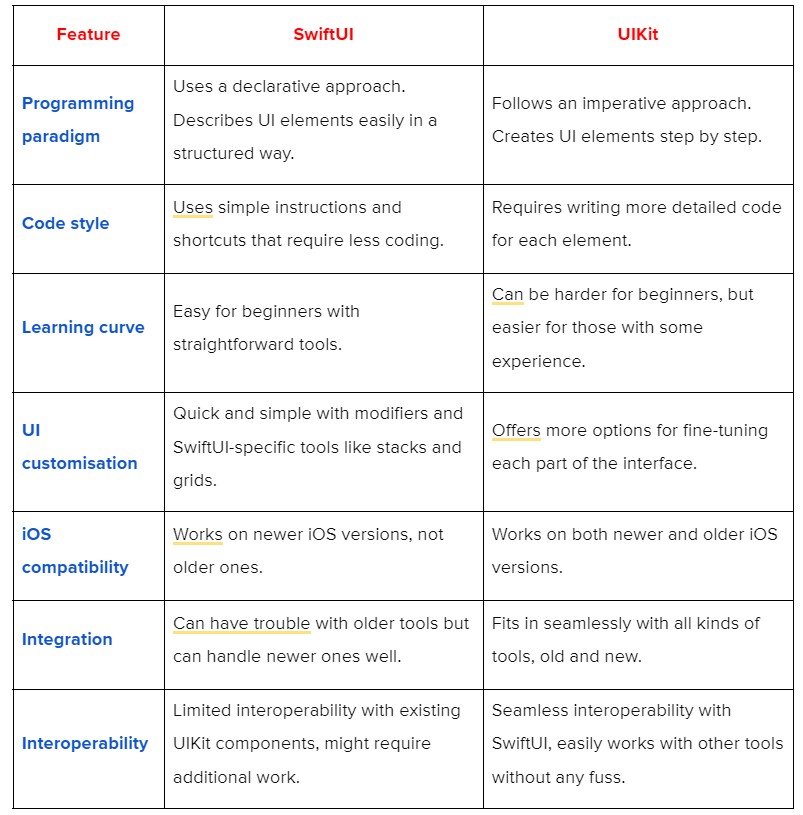
SwiftUI vs. UIkit: Which one to choose?
To help you make a well-informed decision, we’ve created a table that highlights the key differences between SwiftUI vs UIKit.
Check it out:
Interoperability between UIkit and SwiftUI
Now, you might be wondering “How can these powerful tools team up and work together”. Well, we’re here to shed some light on that as well!
- Smooth integration:
UIKit and SwiftUI can work together seamlessly, which means, you can use them both in the same project without any hassle. This makes it easy to mix and match elements from both frameworks to get the desired results.
- Sharing data and components:
You can easily share data and features between SwiftUI and UIKit. So, if you have some unique elements you’ve made with UIKit, you can use them in your new SwiftUI projects, and vice versa.
- Utilizing UIKit’s extensive ecosystem:
With this interoperability, you can still use all the things you’ve built with UIKit, like custom views or special animations, in your new SwiftUI projects. It’s like getting the best of both worlds!
- Flexible development:
Because SwiftUI and UIKit can work together, you have more flexibility in how you build your app. You can start with SwiftUI for the easy stuff and switch to UIKit for the tricky bits later, or mix them up, however you like.
In a nutshell, interoperability between UIKit and SwiftUI makes app development much easier and more flexible. You can use the simple, modern features of SwiftUI while still making the most of all the powerful tools and libraries in UIKit.
It’s a win-win for iOS developers!

Custom pull-to-refresh for Discord
Should you Learn UIKit or SwiftUI
When deciding between UIKit vs SwiftUI, think about your goals as an iOS developer. Check out what’s trending in the job market too– while UIKit has been around for some time now, SwiftUI is becoming more popular for new projects.
If you’re working on an existing app, you might need to stick with UIKit to keep things simple. But if you’re starting something from scratch or joining a team that’s all about SwiftUI, then learning how to work on it could certainly give you an edge.
Furthermore, consider how you like to learn and work. SwiftUI is newer and uses a more straightforward way of doing things, which some people find comparatively easier to understand. But if you’re used to the traditional style of UIKit, you might prefer hanging on to that.
You don’t have to pick just one though. Learning both UIKit and SwiftUI gives you more options and makes you more versatile as a developer. You could start with UIKit and then move on to SwiftUI later, or learn both at the same time.
Ultimately, whether you pick UIKit or SwiftUI boils down to your goals, the projects you’re working on, and what feels right for you. Both frameworks have their pros and cons, so it’s all about finding the best fit for your skills and career path.
No matter, if you’re leaning towards SwiftUI or sticking to UIkit, Shakuro is here to help. Our team of experts can guide you through the entire process and help you build incredible iOS apps that stand out.
Reach out to us now to discover how we can take your iOS development journey to the next level. Let’s bring your ideas to life, together!