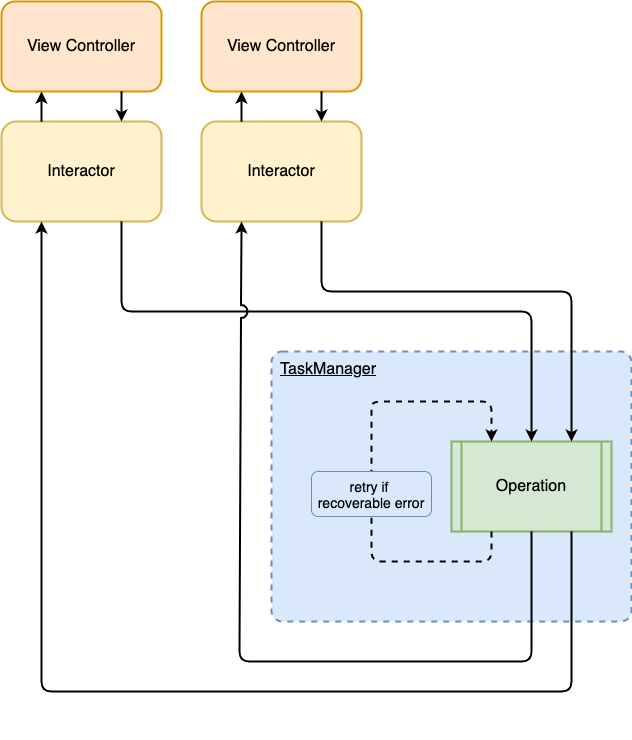
Introducing Task Manager — a Swift library developed by Shakuro iOS developers for easier management of asynchronous operations when developing an iOS app. The main purpose of the Task Manager component is to encapsulate work with the server, database, and other background operations into unit-like operations or tasks. This helps to separate business logic from UI and reuse operations across the app. Let’s see exactly how it works and in what ways it can be of use to an iOS developer.
Contents:
What it’s about and how it works
Usually, when designing an app’s architecture, an iOS developer has to think about ways to control the flow of operations and dependencies between them. It’s really up to a developer to find the most suitable solution for a given project. Asynchronous operations are a complicated topic because of the semantics of how things tie together when you can do them at the same time. Some developers use a singleton network manager for managing operation dependencies, describing all the server requests in one class. The main problem of such an approach is that the singleton class has too many responsibilities because it contains each service call including the endpoint, body, parameters, and it handles the success and failure of each call.
Task Manager is our solution to this problem. Over the years, we at Shakuro have been working on more and more complex iOS apps. That’s why our team busied themselves with coming up with tools that might make iOS development easier and faster. One of the examples of such tools happens to be the Task Manager library that simplifies the work with asynchronous tasks resulting in speeding up development time and reducing costs.
It optimizes work and lets you split your code into smaller elements and set their dependencies and priorities:

Task Manager lets you create separate operations where you describe how server communication should work and how the data should be received and stored, build basic dependencies between them so that later on when working on more intricate stuff, you won’t have to tediously describe these basic connections over and over again.
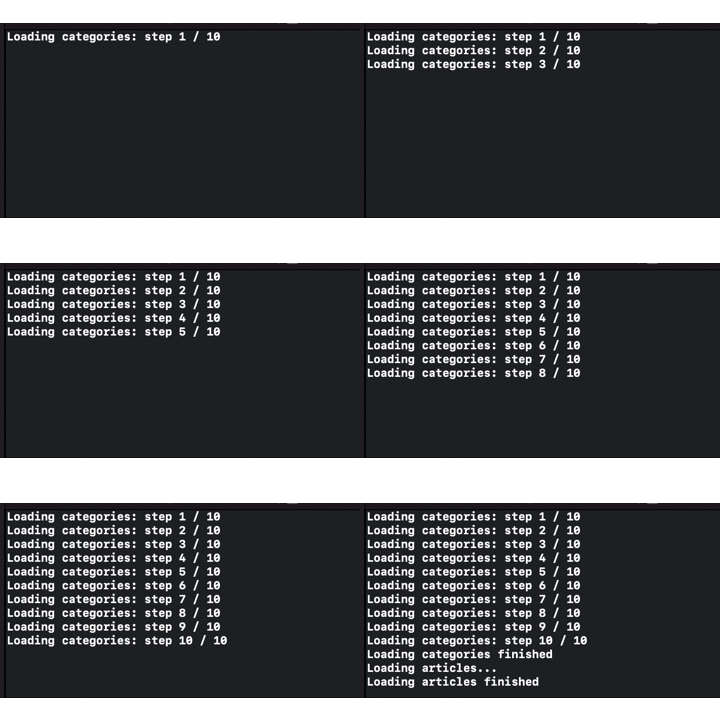
For example, imagine that while developing an e-commerce app you need an operation that involves loading some articles. But for it to work, the relevant categories must load first. Using Task Manager, you indicate the dependency of “article operation” on the “category operation” beforehand so that then, when you load articles, categories would load first automatically:

Result:
- Reduced complexity even when working with more elaborate architectures
- Cleaner code
- Fewer errors
- Faster processes
- Reduced cost.
Advantages
In other words, with Task Manager:
- You can create your own operations to split your work elements into smaller classes and encapsulate them in separate logic units. It makes your code more reusable and stable.
- You can easier resolve dependencies between operations making the iOS development process considerably more convenient.
- Task Manager lets your operations return the typed result and avoid possible errors connected to array and object types.
- You can retry asynchronous operations. If an operation results in a failure, you can analyze the result and retry an operation adding conditions depending on what type of error you got without you writing all the code manually and repeating it with every other operation.
- You get a transparent, flexible, and easy-to-use tool.
Using Task Manager
Quick start
- Creating Task Manager (here we will use our HTTPClient):
Internal class ExampleTaskManager: TaskManager {
    private let randomOrgClient: HTTPClient
    init(name: String,
         qualityOfService: QualityOfService,
         maxConcurrentOperationCount: Int,
         randomOrgClient: HTTPClient) {
        self.randomOrgClient = randomOrgClient
        super.init(name: name,
                   qualityOfService: qualityOfService,
                   maxConcurrentOperationCount: maxConcurrentOperationCount)
    }
    internal func doFirstOperation() -> Task<Int> {
        return performOperation(operationType: FirstOperation.self, options: ExampleOperationOptions())
    }
}
- Creating your operation:
class FirstOperation: BaseOperation<Int, ExampleOperationOptions> {
    override func main() {
        let numberOfSteps: Int = 10
        for index in 1...numberOfSteps {
            print("FirstOperation: substep #\(index) / \(numberOfSteps)")
            Thread.sleep(forTimeInterval: 0.5)
            if isCancelled {
                break
            }
        }
        if isCancelled {
            finish(result: .cancelled)
        } else {
            finish(result: .success(result: numberOfSteps))
        }
    }
    internal override var priorityValue: Int {
        return 0
    }
    internal override var priorityType: OperationPriorityType {
        return OperationPriorityType.fifo
    }
}
- Running an operation from your view controller:
internal class ExampleTaskManagerViewController: UIViewController {
    private let taskManager: ExampleTaskManager
    required init?(coder aDecoder: NSCoder) {
        let randomOrgClient = HTTPClient(name: "RandomOrgClient")
        taskManager = ExampleTaskManager(
            name: "com.shakuro.iOSToolboxExample.ExampleTaskManager",
            qualityOfService: QualityOfService.utility,
            maxConcurrentOperationCount: 6,
            randomOrgClient: randomOrgClient)
        super.init(coder: aDecoder)
    }
    override func viewDidLoad() {
        super.viewDidLoad()
    }
    @IBAction private func operationButton1Tapped() {
        let task = taskManager.doFirstOperation()
        task.onComplete(queue: DispatchQueue.main, closure: { (_, result) in
            print("operationButton1Tapped() completion. result: \(result)")
        })
    }
}
* * *
After we started to use Task Manager while developing our iOS apps, it allowed us to manage task execution in a cleaner, faster, and more organized way. It’d be great if it happens to be of use to other developers who also want to become more efficient.
You can find more details about the Task Manager library on GitHub. Just follow its README and enjoy an easier and more effective process of iOS development.
Written by Sergey Popov and Kate Shokurova
