
The starting point of the Beacons movement is considered to the development of iBeacons by Apple, announced in 2013. Beacons are the devices supporting the Bluetooth Low Energy technology. Their task is simple – serially send data packages (advertisement packets).
This packet consists of the following parts:
- The 3-component beacon ID:
- UUID – 16 byte. For example your company ID, retail store ID, etc.
- Major – 2 byte. The city ID where your company/store is located.
- Minor – 2 byte. The GPS coordinates of a specific venue.
- TX Power – 1 byte. This is a paragon of the signal strength. The paragon is the signal strength at the distance of 1 meter from the beacon. Measures in dBm.
The iBeacon solution was only fit for iOS. Android had to use third-party libraries (like Android beacon library).
What is Eddystone?
In July of 2015, Google announced Eddystone- an open format for Bluetooth beacons. This technology is also compatible with iOS, as the packets format is similar to the iBeacon one. Eddystone can cast 4 types of packets:
- Eddystone-UID. This is the same identifier, an analog of iBeacon (UUID, Major, Minor). Eddystone-UID consists of the two parts:
- Namespace ID (10 byte)
- Instance ID (96 byte)
- Eddystone-EID pseudo-randomly changes its 8-byte AES-encrypted identifier with a developer-set average life period every few minutes. As for the rest, it acts similarly to the UID frame.
- Eddystone-TLM telemetry accesses such data as battery capacity, battery charge level, gadget temperature, and the number of packets sent.
- Eddystone-URL transmits the URL to a website protected by means of SSL. This beacon is the base of the Physical Web technology. URL limit is 10 byte.
For the complex operations using beacons, Google developed a number of independent solutions under the unified Google’s Beacon Platform. It includes the Eddystone format, the Beacon Dashboard monitoring and management system, and the APIs for beacons interaction (like Google Proximity Beacon API, Nearby Messages API, and Places API).
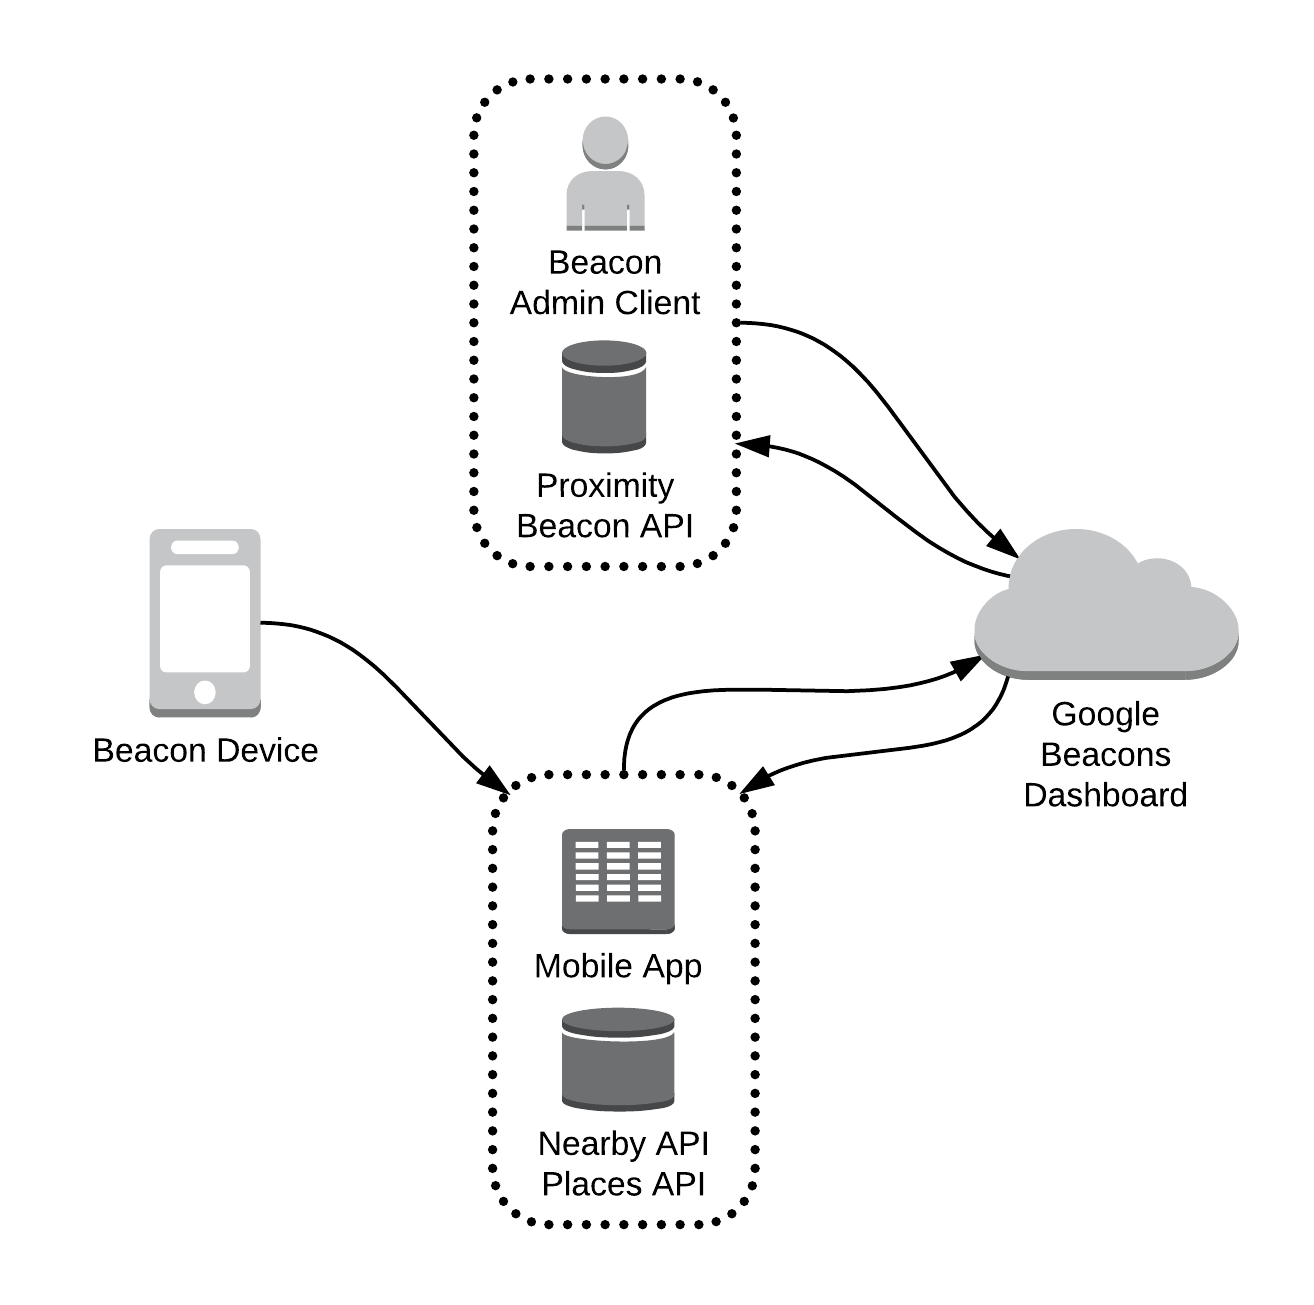
Nearby Messages API is the API for Android and iOS that scans devices, collects data from the Google Cloud, Beacon information, and the attached data.
Google Proximity Beacon API is the API for beacon management and administration. Briefly, there is a Google cloud where all the beacons are registered by their identifiers. You can use a special Proximity Beacon API or a Beacon Tools app for this. *
With the help of Google Beacon Platform you can only register beacons with support of Eddystone. After that you can bind data to the beacon, the so-called Attachments. With Beacon Dashboard you can not only register beacons, but also easily monitor and manage attachments via a usable interface. After this, you can interact with other beacons on the devices using Nearby Messages API and Places API. Places API is the UI, allowing binding Place ID metadata to the beacons.
Nearby
Nearby is the technology of network data exchange. This tool delivers content for users based on their location. Through this technology you can implement notifications connected to the place or a person. An important aspect is the interaction with the other devices. The API-UI of Nearby Connections API allows an app to easily discover other devices of the local network, connect, and exchange messages in realtime. Nearby is available starting from the Android version 4.4 (KitKat).
Physical Web
Physical Web is the ability to translate a regular URL from a beacon to the mobile devices with the help of Bluetooth Low Energy (BLE) technology. The Eddystone-URL packet is sent from a beacon and received by the devices with Bluetooth on. For example, there is a beacon in a store, sending notifications with links through bluetooth. Users within the reach of the beacon can access this notification and follow the link to the store website to see the entire catalog.
Physical Web is like a QR-code, only a QR-code is passive and has to be found first, then you have to open an app with a camera, zoom in, get the URL and follow the link. In Physical Web, it’s enough to be within the reach of the beacon with the device bluetooth on.
Registering Beacons
First, enter the Google console for developers, activate Nearby Messages API and Google Proximity Beacon API. Also, create an API key for the app working with Nearby Messages API. As a limitation for the key, select Application for Android. After that, enter the packet application name and the checksum of the SHA-1 certificate for OAuth 2.0 client ID. Then, with the help of the Proximity Beacon API or Android/iOS Beacons Tools app, fill in the following fields:
- Advertised ID (mandatory)
- Status – active/inactive/obsolete
- Stability – stable/rarely portable expresses the expected consistency of distribution.
- Latitude and longitude – a pair of variables in degrees. Has to be compatible with the representation WGS84 if not specified. The values have to be within the normalized scope.
- Indoor floor level – human readable line indicating the floor where the beacon is located.
- Google Places API Place ID
- Text description
- Arbitrary properties as key/value pairs
The advertised ID must be a correct Eddystone-UID identifier of the beacon (16 byte with 10 byte of namespace ID and 6 byte of instance ID). The ID value has to be base64 implementation of data.
Beacons are presented as the beacon source and can be registered by means of the beacons.register source. A beacon can be registered simultaneously in a only one project at a time on Google Developers Console. An attempt to register a beacon the second time might lead to an error. As soon as the beacon is registered, its AdvertisedID field cannot be edited.
A setup example with the help of Google Proximity Beacon API:
HTTP method:
POST

Request URL:
https://proximitybeacon.googleapis.com/v1beta1/beacons:register

Request body: {
	"advertisedId": {
    "type": "EDDYSTONE",
    "id": "Fr4Z98nSoW0hgAAAAAAAAg=="
  },
  "status": "ACTIVE",
  "placeId": "ChIJTxax6NoSkFQRWPvFXI1LypQ",
  "latLng": {
    "latitude": "47.6693771",
    "longitude": "-122.1966037"
  },
  "indoorLevel": {
    "name": "1"
  },
  "expectedStability": "STABLE",
  "description": "An example beacon.",
  "properties": {
    "position": "entryway"
  }
}
Response:
If the action has been successful, it’s indicated by the code 200 OK response status. The body of the response contains a beacon’s JSON representation with the beacon.beaconName value that can be used as a link for beacon management.
After the beacon is registered it can’t be deleted from Google Beacons Registry. There are two ways to take the beacon into an offline mode:
- Invoke beacons.deactivate to temporarily delete the beacon from a project. After deactivation, the API will not be returning neither the bound data, nor the information about the beacon. In order to turn the beacon back into the working mode, invoke beacons.activate.
- Invoke beacons.decommission to permanently deactivate beacon ID from the project. You can’t use the ID that has been associated with it before. But you can easily assign a new ID to the beacon and re-register the beacon with a new ID.
Attachments
The generic data, called Attachments can be bound to the beacons. Attachments are blobs stored in Google’s scalable cloud. Currently, Attachments are only available for the project they were created in, with no availability for other projects.
To create an Attachment, fill in two fields:
- namespacedType is the line consisting of the identifier of namespace, slash, and data type. For example, surreptitious-banjo-145/string.
- Data – base64 representation of data type, defined in the namespacedType field. For example, aGVsbG8gd29ybGQh
In order to figure out which namespaces are associated to which projects, you can invoke namespace.list.
Attachments can up to 1024 byte long. You can use any string that matters for your application, for example, a bus stop ID, store location, structured data like JSON, or a link to an external database.
You can manage beacons in Google Beacons Dashboard. The main dashboard window looks like this:
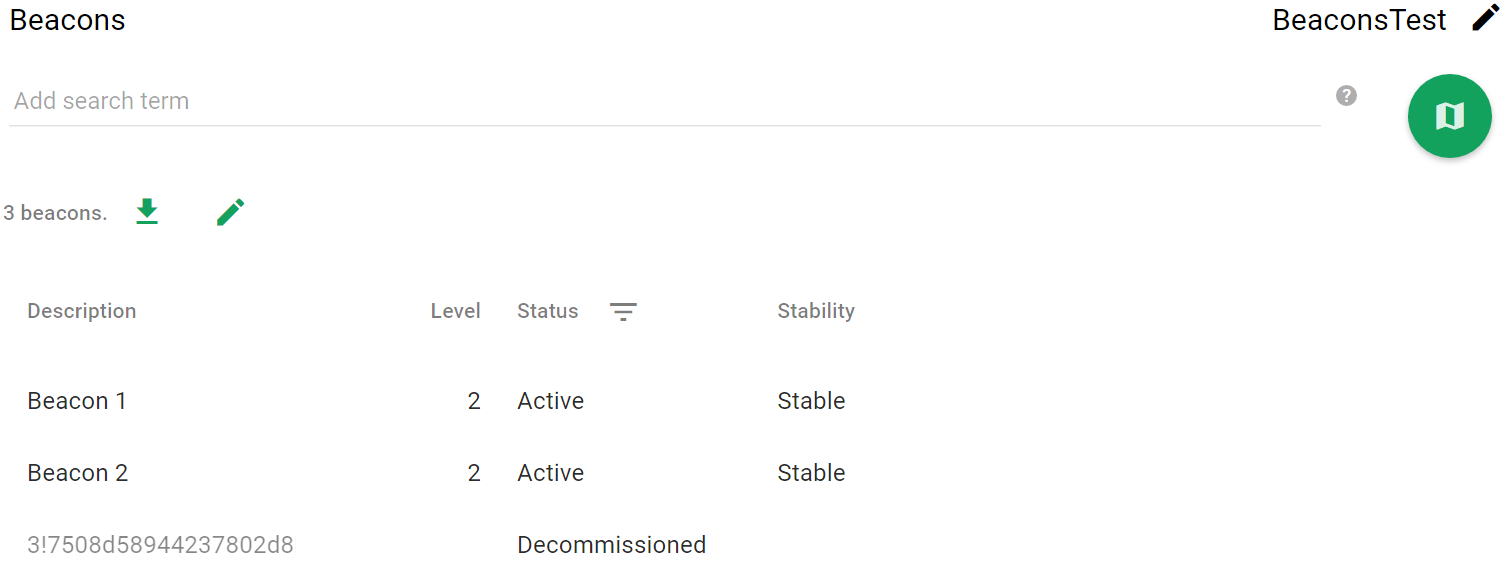
You can also change the beacon configuration and add attachments here.
Nearby Messages API
Nearby Messages API is the API that allows different devices to publish and subscribe to messages, thus exchange data. Nearby Messages API is the part of Nearby. For message exchange, the devices must not be on the same network, but must be connected to the internet. In this case, the smartphone or tablet that is to receive messages must be connected to the internet. The beacons don’t require internet connection. Nearby Messages API allows message exchange through Bluetooth, bluetooth Low Energy, Wi-Fi, and even ultrasound, but Bluetooth Low Energy allows to minimize energy consumption.
Nearby Messages API is available on Android devices in the Google Play services library version 7.8.0 and newer.
Setting up the project:
In the build.gradle, add play-services-nearby as a dependency:
dependencies {
    compile fileTree(dir: 'libs', include: ['*.jar'])
    testCompile 'junit:junit:4.12'
    compile 'com.google.android.gms:play-services-nearby:9.0.0'
}
In the AndroidManifest.xml manifest, specify API_KEY, stored in the Google console storage, in Credentials:
<application
        android:allowBackup="true"
        android:icon="@mipmap/ic_launcher"
        android:label="@string/app_name"
        android:supportsRtl="true"
        android:theme="@style/AppTheme">
        <meta-data
            android:name="com.google.android.nearby.messages.API_KEY"
            android:value="YOUR_API_KEY" />

        <.../>

    </application>
In the application, create GoogleApiClient and add Nearby Messages API:
private synchronized void buildGoogleApiClient(){
        if (mGoogleApiClient == null) {
            mGoogleApiClient = new GoogleApiClient.Builder(this)
                    .addApi(Nearby.MESSAGES_API, new MessagesOptions.Builder()
                        .setPermissions(NearbyPermissions.BLE).build())
                    .addConnectionCallbacks(this)
                    .enableAutoManage(this, this)
                    .build();
        }
    }
In order to receive messages from the beacons, first subscribe to them, in either of the two following ways:
- If the application is active, as a response to the user action or event.
- In the background, i.e. when the application is inactive.
For parsing, use MessageListener:
   MessageListener mMessageListener = new MessageListener() {
        @Override
        public void onFound(Message message) {
            String messageAsString = new String(message.getContent());
            Log.d(TAG, "Found message: " + messageAsString);
            Log.d(TAG, "Message namespace: " + message.getNamespace());
            Log.d(TAG, "Message type: " + message.getType());
        }

        @Override
        public void onLost(Message message) {
            String messageAsString = new String(message.getContent());
            Log.d(TAG, "Lost sight of message: " + messageAsString);
        }
    };
Active mode subscription
When the app subscribes to the beacons’ messages in the active mode. Scanning is performed continuously until the app unsubscribes. Such a subscription is recommended to be used only when the application is active, usually as a response to some user actions.
MessageListener mMessageListener = new MessageListener() {
	@Override
	public void onFound(Message message) {
		String messageAsString = new String(message.getContent());
		Log.d(TAG, "Found message: " + messageAsString);
		Log.d(TAG, "Message namespace: " + message.getNamespace());
		Log.d(TAG, "Message type: " + message.getType());
	}

	@Override
	public void onLost(Message message) {
		String messageAsString = new String(message.getContent());
		Log.d(TAG, "Lost sight of message: " + messageAsString);
	}
};

SubscribeOptions options = new SubscribeOptions.Builder()
		.setStrategy(Strategy.BLE_ONLY)
		.build();

Nearby.Messages.subscribe(mGoogleApiClient, mMessageListener, options).setResultCallback(new ResultCallback<Status>() {
	@Override
	public void onResult(@NonNull Status status) {
		if (status.isSuccess()) {
			Log.i(TAG, "Subscribed successfully.");
		} else {
			Log.e(TAG, "Operation failed. Error: " +
					NearbyMessagesStatusCodes.getStatusCodeString(
							status.getStatusCode()));
		}
	}
});
Background subscription
Subscription in the background is initiated by the Intent service:
   private void subscribe() {
        SubscribeOptions options = new SubscribeOptions.Builder()
                .setStrategy(Strategy.BLE_ONLY)
                .build();

        Nearby.Messages.subscribe(mGoogleApiClient, getPendingIntent(), options)
                .setResultCallback(new ResultCallback<Status>() {
                    @Override
                    public void onResult(@NonNull Status status) {
                        if (status.isSuccess()) {
                            Log.i(TAG, "Subscribed successfully.");
                            startService(getBackgroundSubscribeServiceIntent());
                        } else {
                            Log.e(TAG, "Operation failed. Error: " +
                                    NearbyMessagesStatusCodes.getStatusCodeString(
                                            status.getStatusCode()));
                        }
                    }
                });

    }

    private PendingIntent getPendingIntent() {
        return PendingIntent.getService(this, 0,
                getBackgroundSubscribeServiceIntent(), PendingIntent.FLAG_UPDATE_CURRENT);
    }

    private Intent getBackgroundSubscribeServiceIntent() {
        return new Intent(this, BackgroundSubscribeIntentService.class);
    }
The Intent service itself:
public class BackgroundSubscribeIntentService extends IntentService {
    private static final String TAG = "BackSubIntentService";

    public BackgroundSubscribeIntentService() {
        super("BackgroundSubscribeIntentService");
    }

    @Override
    protected void onHandleIntent(Intent intent) {
        if (intent != null) {
            Nearby.Messages.handleIntent(intent, new MessageListener() {
                @Override
                public void onFound(Message message) {
                    String messageAsString = new String(message.getContent());
                    Log.d(TAG, "Found message: " + messageAsString);
                }

                @Override
                public void onLost(Message message) {
                    String messageAsString = new String(message.getContent());
                    Log.d(TAG, "Lost sight of message: " + messageAsString);
                }
            });
        }
    }
}
If the subscription is no longer necessary, unsubscribe by invoking
Nearby.Messages.unsubscribe(GoogleApiClient, PendingIntent).
Emulating Beacons
If for some reason there is no beacons available at hand, there is a way to utilize a third-party beacon emulators.
- Node-eddystone-beacon. A cross-platform project. It can distribute 3 types of packets:
- Eddystone-UID
- Eddystone-URL
- Eddystone-TLM
It works on top of the NodeJS. The emulator device, for example a laptop must support Bluetooth v4 (Bluetooth Low Energy).
- Beacon Simulator. A beacon emulator app for Android.
Demo
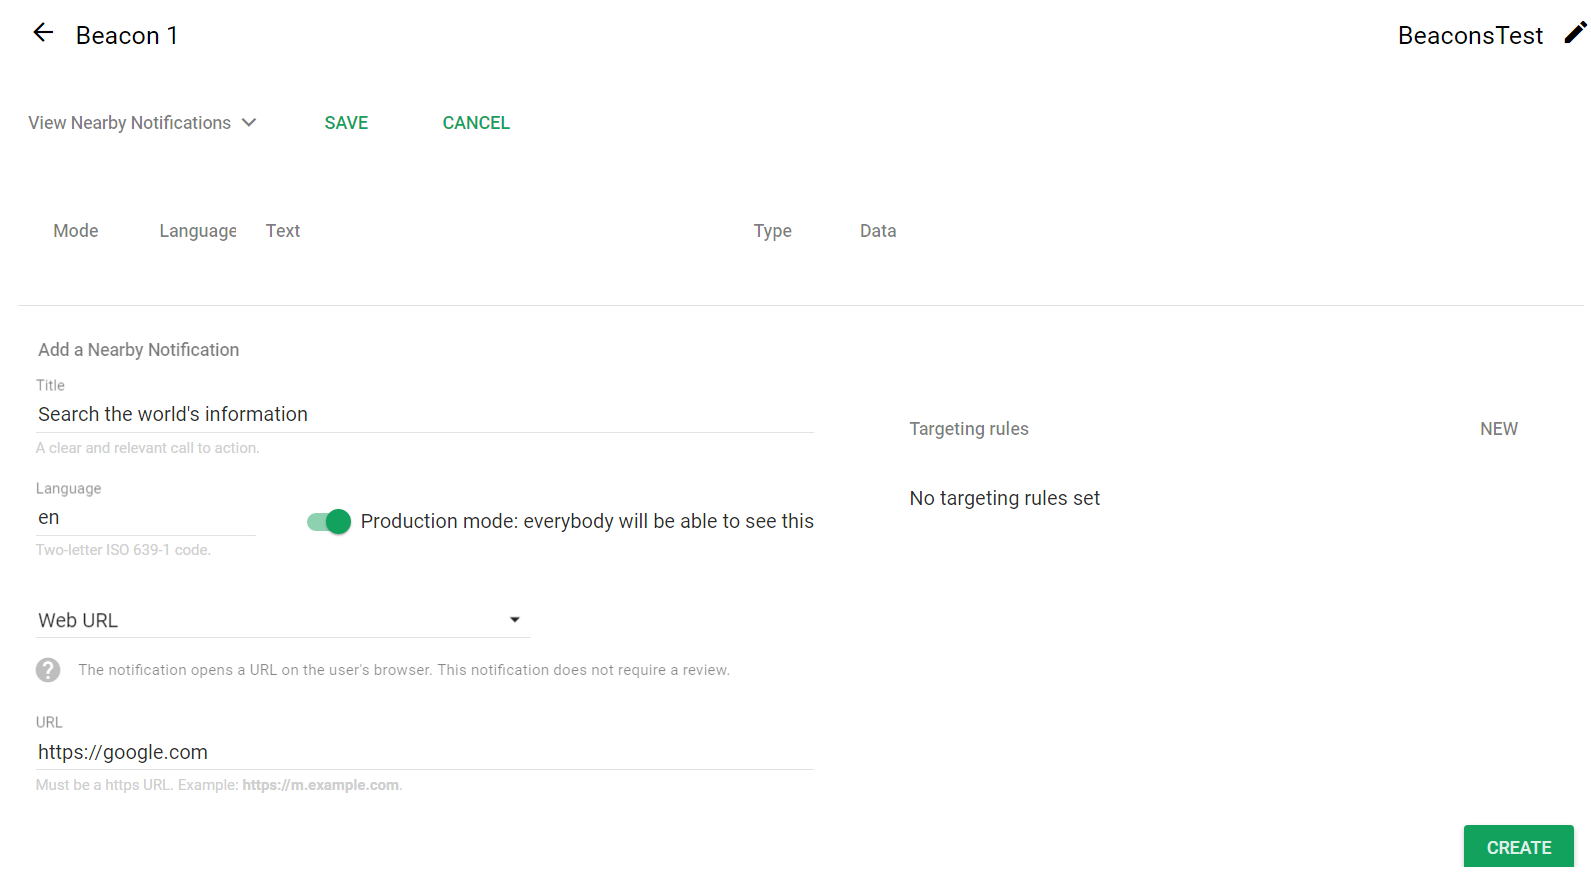
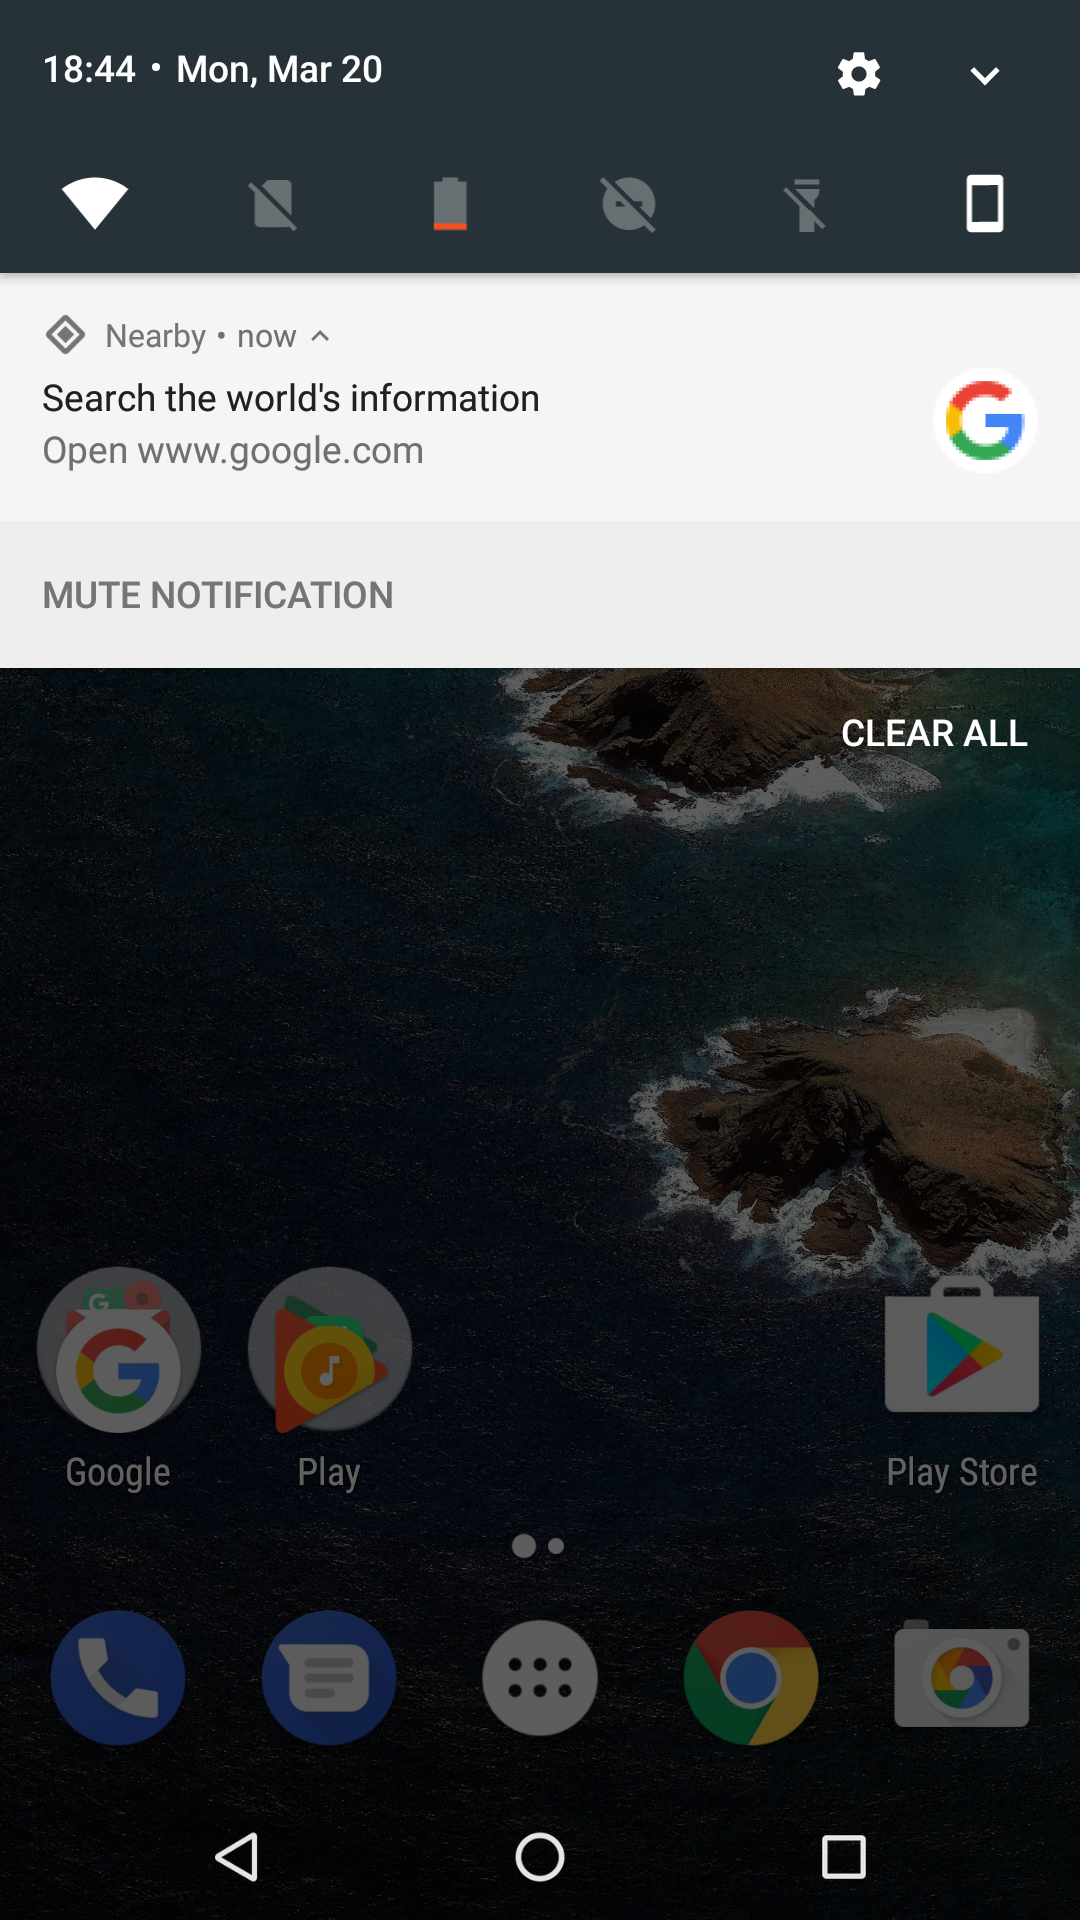
Let’s check Eddystone-UID. In Google Beacons Dashboard, add notification to the beacon. This notification will be distributed from the beacon to all the users within the reach of its signal with their bluetooth on and active internet connection. Say, the title is “Search the world’s information” and as the URL, let’s set https://google.com.
The device in the beacon zone had active internet connection and bluetooth on. The notification is:
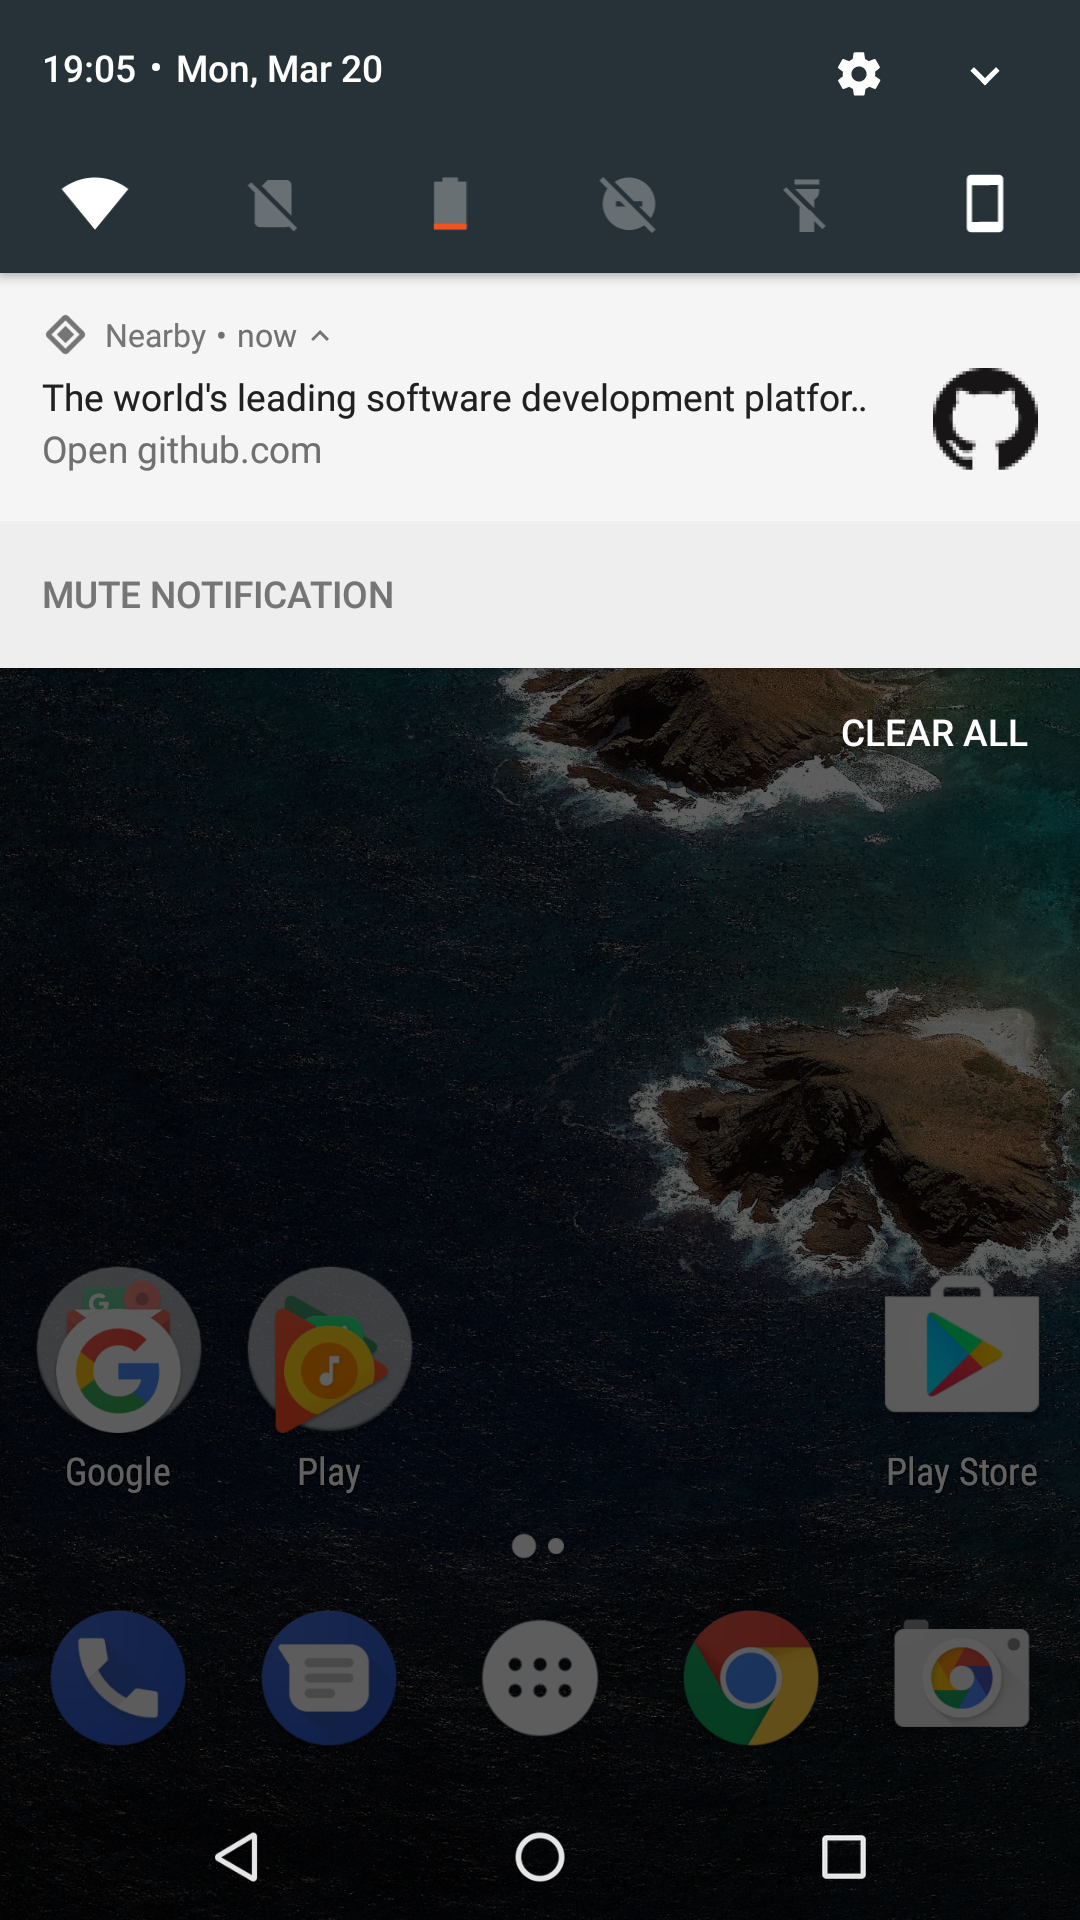
Let’s check Eddystone-URL. For this: in the beacons settings, I provided the https://github.com/ URL. After this, a notification with github link appears:
Beacon Tools apps:
For Android.
For iOS.
Selected sources:
https://developers.google.com/beacons/
https://www.youtube.com/watch?v=3nYyApSiSLQ
https://codelabs.developers.google.com/codelabs/hello-beacons/#0
https://habrahabr.ru/post/278443/
https://habrahabr.ru/post/279381/
https://habrahabr.ru/post/279379/
https://habrahabr.ru/article/302978/
https://habrahabr.ru/post/274585/
http://droidtune.com/15238/google-nearby-servis-vzaimodejstviya-s-okruzhayushhim-mirom.html
https://nvworld.ru/news/google-releasing-nearby/
https://habrahabr.ru/post/256071/
