
SwiftUI and Combine are Apple’s latest frameworks. With their introduction, the long-expected declarative UI became a reality, and it was truly an event of historic proportions in the world of iOS development. Its declarative approach stands contrary to an imperative one, that iOS developers, including us, were using before iOS 13. No wonder they are excited! It removes a lot of complications from the UI-building process. We decided to create this Combine/SwiftUI tutorial to share our knowledge and show how these two frameworks can be used together to their mutual advantage.
By presenting Combine Apple has made their first steps towards Functional Reactive Programming (FRP), which is expected to gain popularity in the upcoming years. Apple is making progress. For the end-users, it means that developers would sooner meet their requirements. But possibly the most useful effect can be produced from making Combine work along with SwiftUI to improve the development process with the help of relevant Combine/SwiftUI tutorials and consequently make better apps.
SwiftUI
Apple defines SwiftUI as a new way to build UIs for Apple platforms using the advantages of Swift.
Another possible definition for SwiftUI is that it’s a framework, a sort of a toolkit, for building UIs in a declarative programming style using Swift in the form of Domain-specific language (DSL).
How SwiftUI simplifies UI building
Today in the vast majority of cases UI building involves using an Interface Builder where you set UI components and their locations relative to each other. Then these components get attached to the code using Outlets, Actions, etc. Thus, the user interface and its behavior are essentially created in two separate places, which in itself is not very convenient.
An alternative to this is making UI in code. Though at the moment this is an even more difficult task. For example, here’s what button building looks like:

As you can see from a piece of code above, it takes to be aware of a lot of nuances:
- You have to be aware of setting the corner radius for a button on its CALayer, instead of a button itself.
- To set an on click event, you need to create a selector, and in order to specify the hello() function there, you set the @objc attribute for a button.
- One more thing you have to be acquainted with is constraints creation.
Along with all the difficulties, you can see the results only after launching an application.
To compare, this is how you create a button in SwiftUI:
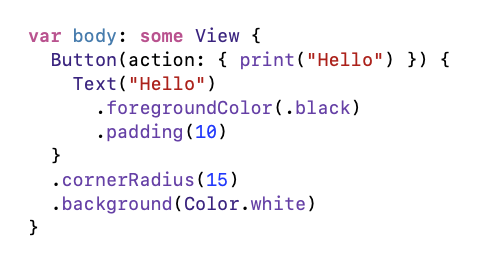
The advantage of the declarative programming of SwiftUI is an easier perception, so to speak. You describe the desired result, as opposed to the imperative approach when you need to set the sequence of specific actions to obtain the wanted result.
How SwiftUI works
As mentioned above, SwiftUI uses DSL. What exactly is Domain-specific language? It’s a so-called domain language that allows describing primitives of a certain particular domain on the basis of a high-level language (in our case it’s Swift). Then, with the help of these primitives, the tasks specific to the subject area are solved. In essence, a new language is built on the basis of the old one.
In the example above, such primitives are Button and Text.
In order for SwiftUI syntax to be as simple and straightforward as possible, some changes were introduced in Swift 5.1.
Here are some of those changes:
- Function builders [SE-XXXX]
Thanks to this addition, syntax like this became possible:
HStack {
Text("SwiftUI")
Text("rocks")
}
- Opaque return types [SE-0244]
It allows you to return a protocol with an associated type from a function and eliminates the need to explicitly specify generic parameters of the return type:
var body: some View {...}
- Property wrappers [SE-0258]
SwiftUI uses this to bind the object’s properties to View.
Combine
Apple describes Combine rather simply as a framework to customize the handling of asynchronous events by combining event-processing operators.
What is behind this description
When you begin to dig into Combine’s documentation, you see such technical terms as Publisher, Subscriber, Operators, Cancellable, Scheduler. It immediately becomes clear that the Combine framework is basically an implementation of Apple’s functional reactive programming (FRP) paradigm. iOS developers familiar with such libraries as RxSwift and ReactiveCocoa, immediately get why Combine was created in the first place and what tasks it is supposed to solve. Besides, with Combine, there’s no more need to use any third-party solutions.
Others though may find it difficult to deal with such abstract concepts which nevertheless help to keep the Combine code concise and easily readable. Let’s look a bit closer at what is behind the key ones.
Publishers
Publishers send values that can change over time to Subscribers (one or many instances) or fail with an error. They support the Publisher protocol:
public protocol Publisher {
    associatedtype Output
    associatedtype Failure : Error
    func receive<S>(subscriber: S) where S : Subscriber, Self.Failure == S.Failure, Self.Output == S.Input
}
Where Output is a type of sent values and Failure is a type of produced error. If a Publisher never fails, then the type of error is Never.
Subscribers
Subscribers receive values from a Publisher (one instance) until the subscription is canceled. They support the Subscriber protocol:
public protocol Subscriber : CustomCombineIdentifierConvertible {
  associatedtype Input
  associatedtype Failure : Error
  func receive(subscription: Subscription)
  func receive(_ input: Self.Input) -> Subscribers.Demand
  func receive(completion: Subscribers.Completion<Self.Failure>)
}
Where Input is a type of received values and Failure is a type of received error. The associated types of Input and Failure are equal to the corresponding Publisher types Output and Failure.
Operators
Publishers and Subscribers hold SwiftUI together, they provide the synchronization between the UI and the underlying model. Besides Publishers and Subscribers, Combine also contains a third feature called Operators. Operators operate on a Publisher, perform some computation, and return another Publisher. For example, a filter operator that opts out some of the values that don’t satisfy the conditions or a map operator that transforms the input values of a certain type into output values of a different type.
What tasks Combine solves
FRP paradigm in general, and Combine in particular increases the level of code abstraction. It allows you to concentrate on events that determine the business logic of the application, instead of spending time dealing with a large number of implementation details. All this allows reducing the amount of boilerplate code (DispatchQueues, Delegates, KVOs, Target-Actions, etc.).
Benefits of using Combine framework:
- Simple asynchronous code.
- Multithreading is simplified.
- Composable components of business logic that can be easily combined into chains.
Let’s say it is necessary for our application to execute 3 asynchronous requests at the same time, and get the execution result.
We could use DispatchGroup and DispatchQueue to solve this complex task. It will require some boilerplate code to create a queue, group, add tasks to the queue, and subscribe to the callback. Things get a little more complicated if asynchronous tasks should return some kind of result. In this case, you’ll need to create instance variables and write and read values from there.
This is how the solution looks like in Combine:
Publishers.Zip3(intAsyncTask, stringAsyncTask, voidAsyncTask)
.sink { (intValue, stringValue, _) in
   // tasks executions are finished
}
The alternative is more concise. This is the declarative approach in action. You can focus on what you need to get, rather than burrowing into an abundance of implementation details.
SwiftUI + Combine
And now let’s see what happens if we use SwiftUI and Combine side by side. Consider a simple example of a username input form.
Let’s define the ResetPasswordModel that has only one field taking the user’s input.
class ResetPasswordModel: ObservableObject {
  @Published var email = ""
}
- ResetPasswordModel conforms ObservableObject protocol, which means that the ResetPasswordModel’s fields can be used for SwiftUI’s bindings.
- The @Published modifier creates a publisher for the email field, so now it is possible to observe the email property.
Second, let’s define the UI with SwiftUI.
struct ResetPasswordView: View {
  @ObservedObject private var model = ResetPasswordModel()
  var body: some View {
    Form {
      Section { TextField("Email", text: $model.email) }
    }
}
- The @ObservedObject is a property delegate that creates a connection between the View and the Model. View is notified when the data source is about to change and consequently re-render itself.
- $model.email – $ sign here is used to create a property wrapper that provides a two-way binding to data, so any changes to the value of email will update the TextField, and any changes to the TextField will update email.
Conclusion
It seems that Apple has done a great job by providing us with instruments that make the UI-building process more efficient. New SwiftUI’s declarative approach delivers a set of advantages including the increased speed of development, better integration between designers and coders, and code quality enhancement.
Use the combining effect of SwiftUI and Combine to produce a well-structured, efficient, and maintainable code.
Do you want to build an iOS app? Reach out to our team to create a versatile project and win a place under the sun.
Written by Ruslan Krohalev and Kate Shokurova
* * *
This SwiftUI + Combine tutorial was originally published in December 2019 and was updated in December 2020 to make it more relevant and comprehensive.
